

How To Create Attachment Column In Sharepoint List
SharePoint Online - Add attachment to an item
The SharePoint Online - Add attachment to an item actionA tool for building the processes, logic, and direction within workflows. adds a selected file to the specified list item.
Before you start
![]() What is SharePoint Online?
What is SharePoint Online?
SharePoint Online is a cloud-based service hosted by Microsoft that helps organizations share and manage content, knowledge, and applications. You can create sites to share documents and information with colleagues, partners, and customers. For more information about SharePoint Online, see Introduction to SharePoint Online.
![]() What is a SharePoint Online site and site collection?
What is a SharePoint Online site and site collection?
A SharePoint site is a website that contains different SharePoint components such as Lists, Document Libraries, Calendars, and Task Lists. SharePoint sites can have 1 or more pages to display content to the user. A SharePoint team site connects your team to the content, information, and apps. For example, a team site can be used to store files or to create and lists to store information.
A SharePoint site collection is a collection of SharePoint sites. Each site collection contains a single top-level site and subsites below it.
![]() What is a list in SharePoint?
What is a list in SharePoint?
A SharePoint list used to store a collection of data and organize information.
Add columns for different types of data, such as text, currency, or multiple choice. You can sort, group, format, and filter lists which can include people, links, pictures, dates, and more.
![]() What is a document library in SharePoint?
What is a document library in SharePoint?
A document library is used to store files that teams can work on together. The default SharePoint Online site and any new sites you create include a document library, and you can create additional document libraries.
For example, you can use a document library on a site in SharePoint Online to store all files related to a specific project.
![]() What is a document set in SharePoint?
What is a document set in SharePoint?
A document set organizes multiple related documents into a single view where they can be worked on and managed as a single entity. You can create a document set involving different file formats (for example, Word documents, OneNote notebooks, PowerPoint presentations, Visio diagrams, excel workbooks, and so on).
When a document set content type is added to a library, users can create new instances of the document set in the same way that they create a single document. For more information, see Introduction to Document Sets article.
![]() What are variables?
What are variables?
Variables are placeholders that store information that changes each time the workflow runs or during execution of a workflow instance. To view a list of all variables that you can use in the workflow, access the Variables pane.
![]() Data types of variables
Data types of variables
The data types of variables are as follows:
- Text: Text string (with optional default value)
- Decimal: Integer numerical with a decimal point (with optional default value)
- Integer: Integer numerical with no decimal (with optional default value)
- Boolean: Yes or No (with optional default value)
- DateTime: YYYY-MM-DD, HH:MM AM/PM (with optional default value)
- Collection: A variable that groups one or more related variables of the same type into an ordered list.
- File: Path to a file. Use this variable type to attach files to email messages. A file path must start with the root folder and end with the file name. Example: /Draft/Contracts/ACME.docx
- Object: A variable that groups several related variables of any type into a hierarchical structure. Objects can contain other Objects.
- Collection of objects: A variable that groups a list of Objects of the same variable structure into a list.
For example, a collection variable named Company name can hold a list of names, such as Safalo, Nintex, and Drawloop.
For example, an Object variable named Company can hold a list of parameters, such as Company name, Email, Address, and Phone number.
Note: Objects can't be created or modified in the Variables panel.
For example, a Collection of object variable named Company details can hold a series of objects, detailing Company name, Email, Address, and Phone number for each Company name Safalo, Nintex, and Drawloop.
Note: You can assign only the variable type that a workflow expects. For example, if you want to capture a Date entry in a form, then you must create a variable of the DateTime type.
![]() Classifications of variables
Classifications of variables
In Nintex Workflow Cloud, variables are classified as follows:
- Workflow variable
Workflow variables include those that you create and define when you configure an action. These variables store values such as collections, path to files, workflow outputsVariable to store a value or file on completion of the workflow. Set up as a user-defined variable., and other data for use throughout the workflow.
-
Start event variable
These variables capture data that are present when the workflow starts.
 Range of Start event variables
 Depending on the Start events you select, one or more of the following start event variables may be available.
- Form field variables capture data that user enters in the fields of a form. These variables are generated when you create a form control. An example is a variable that holds an email address entered into a web form (Nintex - Form).
-
Start event context variables, such as an identifier for the selected object (app start events). These variables are passed to the workflow as Start event context variables. Example: an object variable called Workflow Initiator that corresponds to the user who triggered to start a workflow. (Available only in Nintex - Form start event)
- Variables with applied formulas are variables that hold calculated values based on the formula defined in the Formula builder. An example is a variable that holds the calculated number of days between two DateTime variables.
- Provided start event variables such as the names of new files that trigger the workflow to run (new file start events; these variables must be explicitly added for use later in the workflow). (Available only in start events using third-party connectors such as Salesforce and Box.)
- Custom start event variables that you create, such as files or data that you want to pass as inputsVariable to store a value or file when the workflow starts. Set up as a start event variable. to a Component workflowA workflow that can be started from outside the tenancy; the workflow uses the "Component workflow" start event.. (Available only in Nintex - Component Workflow start event)
-
Context variable
These variables represent data that are related to the current workflow instanceAn occurrence of a workflow. such as Current date (DateTime), Current date and time (DateTime), Workflow instance ID (Text), Workflow name (Text), and Workflow ID (Text).
- Form-based task variable
-
Form variables - Variables that correspond to controls that you add to a form. Form variables are used only when assignees respond to a task, wherein they select an outcome and fill in a form.
-
Form URL - A variable that contains the form URL that an assignee can use to access a form.
-
Task name (Form link) - A variable that contains a hyperlink to the form URL using the Task name.
These variables capture data that are entered in forms as part of a Form-based task. The following form-based task variables are generated automatically when you configure the Form field for the action:
Note:
-
Form variables for theAssign a task to multiple users action are found in the Task responses collection and First response object.
-
Both Task responses collection and First response object include the Task responder and Outcome variables
-
While the Tasks responses collection contains all task responses, theFirst response object contains only the task response of the first user that responds to the task.
-
To find the Task responses collection or First response object in the Insert variables panel or Variables panel, click the Task name or Action name for the Assign a task to multiple users action > Task name or Action name (Object) > Task responses collection or First response object.
The Variable category name can be:
-
Task name: The name of the action that is defined in the Task name field.
-
Action name: If a variable is inserted as the Task name, the Variable category name can be the default action name or custom name if the action was renamed.
-
-
-
You can use Form URL and Task name (Form link) variables only within the same action.
-
To access each individual response from the Task responses collection, use the Loop for each action.For more information on the Loop for each action, see Loop for each.
- When you use objects such as Start event variables or workflow action variables in your workflow, the workflow object is dynamically added to the form toolbox. You can use the data from these object variables in a form. See Workflow Objects for more information.
![]() How do I add variables to my workflow?
How do I add variables to my workflow?
You can insert existing variables into configuration fields for workflow actions and you can create user-defined variables for use throughout your workflow. Depending on the selected start event, you may be able to add provided start event variables or create your own.
![]() Insert a variable into an action field
Insert a variable into an action field
Each field that accepts variables accommodates one or more methods for inserting variables. Some fields allow you to type ahead and select from a filtered list of existing variables while others require selection from a drop-down list or from the Insert variables dialog box.
In the Action configuration panel, do one of the following.
- Select an existing variable from a filtered list:
- In fields that accept variables, type [[.
-
Continue typing to filter the list of displayed variables.
-
Click the variable you want.
A drop-down list of existing variables appears.
Note: If you want to type two opening square bracket characters instead of displaying existing variables from a filtered list, press Esc and the variables list disappears.
-
Select an existing variable from the drop-down list for the field.
-
Select a new or existing variable from the Insert variables dialog box:
-
Either click + Insert or click Add variable from the drop-down list.
The Insert variables dialog box appears.
- To create and insert a variable
- Click theWorkflow tab.
- Click
 Create variable.
 - For Name, type the internal name you want to use.
-
For Type, select a variable type corresponding to the type of data you want to store.
Variable types - Text: Text string (with optional default value)
- Decimal: Integer numerical with a decimal point (with optional default value)
- Integer: Integer numerical with no decimal (with optional default value)
- Boolean: Yes or No (with optional default value)
- DateTime: YYYY-MM-DD, HH:MM AM/PM (with optional default value)
- Collection: A variable that groups one or more related variables of the same type into an ordered list.
- File: Path to a file. Use this variable type to attach files to email messages. A file path must start with the root folder and end with the file name. Example: /Draft/Contracts/ACME.docx
- Object: A variable that groups several related variables of any type into a hierarchical structure. Objects can contain other Objects.
- Collection of objects: A variable that groups a list of Objects of the same variable structure into a list.
For example, a collection variable named Company name can hold a list of names, such as Safalo, Nintex, and Drawloop.
For example, an Object variable named Company can hold a list of parameters, such as Company name, Email, Address, and Phone number.
Note: Objects can't be created or modified in the Variables panel.
For example, a Collection of object variable named Company details can hold a series of objects, detailing Company name, Email, Address, and Phone number for each Company name Safalo, Nintex, and Drawloop.
-
For Default value, if relevant, update the provided default value.
-
For Component workflowsA workflow that can be started from outside the tenancy; the workflow uses the "Component workflow" start event.: To mark the variable as a workflow outputVariable to store a value or file on completion of the workflow. Set up as a user-defined variable., select the Output check box.
For more information about these fields, see Toolbar.
- Click Create & insert.
The Insert variables panel appears.
Note: The Create variable button is available only if you have previously created a variable.
The Create variable dialog box appears.
The new variable appears in the configuration field.
-
![]() Create a user-defined variable
Create a user-defined variable
You can create user-defined variables from the action configuration panel when you're configuring a workflow action or from the toolbar of the workflow designer.
![]() During action configuration
During action configuration
Each field that accepts variables accommodates one or more methods for inserting variables. Some fields allow you to type ahead and select from a filtered list of existing variables while others require selection from a drop-down list or from the Insert variables dialog box.
In the Action configuration panel, do one of the following.
- Select an existing variable from a filtered list:
- In fields that accept variables, type [[.
-
Continue typing to filter the list of displayed variables.
-
Click the variable you want.
A drop-down list of existing variables appears.
Note: If you want to type two opening square bracket characters instead of displaying existing variables from a filtered list, press Esc and the variables list disappears.
-
Select an existing variable from the drop-down list for the field.
-
Select a new or existing variable from the Insert variables dialog box:
-
Either click + Insert or click Add variable from the drop-down list.
The Insert variables dialog box appears.
- To create and insert a variable
- Click theWorkflow tab.
- Click Create variable.
- For Name, type the internal name you want to use.
-
For Type, select a variable type corresponding to the type of data you want to store.
Variable types - Text: Text string (with optional default value)
- Decimal: Integer numerical with a decimal point (with optional default value)
- Integer: Integer numerical with no decimal (with optional default value)
- Boolean: Yes or No (with optional default value)
- DateTime: YYYY-MM-DD, HH:MM AM/PM (with optional default value)
- Collection: A variable that groups one or more related variables of the same type into an ordered list.
- File: Path to a file. Use this variable type to attach files to email messages. A file path must start with the root folder and end with the file name. Example: /Draft/Contracts/ACME.docx
- Object: A variable that groups several related variables of any type into a hierarchical structure. Objects can contain other Objects.
- Collection of objects: A variable that groups a list of Objects of the same variable structure into a list.
For example, a collection variable named Company name can hold a list of names, such as Safalo, Nintex, and Drawloop.
For example, an Object variable named Company can hold a list of parameters, such as Company name, Email, Address, and Phone number.
Note: Objects can't be created or modified in the Variables panel.
For example, a Collection of object variable named Company details can hold a series of objects, detailing Company name, Email, Address, and Phone number for each Company name Safalo, Nintex, and Drawloop.
-
For Default value, if relevant, update the provided default value.
-
For Component workflowsA workflow that can be started from outside the tenancy; the workflow uses the "Component workflow" start event.: To mark the variable as a workflow outputVariable to store a value or file on completion of the workflow. Set up as a user-defined variable., select the Output check box.
For more information about these fields, see Toolbar.
- Click Create & insert.
The Insert variables panel appears.
Note: The Create variable button is available only if you have previously created a variable.
The Create variable dialog box appears.
The new variable appears in the configuration field.
-
![]() From the toolbar
From the toolbar
-
Click Variables.
The Variables panel appears, displaying the Workflow tab that is selected by default.
- To create a variable
- Click theWorkflow tab.
- Click Create variable.
- For Name, type the internal name you want to use.
-
For Type, select a variable type corresponding to the type of data you want to store.
Variable types - Text: Text string (with optional default value)
- Decimal: Integer numerical with a decimal point (with optional default value)
- Integer: Integer numerical with no decimal (with optional default value)
- Boolean: Yes or No (with optional default value)
- DateTime: YYYY-MM-DD, HH:MM AM/PM (with optional default value)
- Collection: A variable that groups one or more related variables of the same type into an ordered list.
- File: Path to a file. Use this variable type to attach files to email messages. A file path must start with the root folder and end with the file name. Example: /Draft/Contracts/ACME.docx
- Object: A variable that groups several related variables of any type into a hierarchical structure. Objects can contain other Objects.
- Collection of objects: A variable that groups a list of Objects of the same variable structure into a list.
For example, a collection variable named Company name can hold a list of names, such as Safalo, Nintex, and Drawloop.
For example, an Object variable named Company can hold a list of parameters, such as Company name, Email, Address, and Phone number.
Note: Objects can't be created or modified in the Variables panel.
For example, a Collection of object variable named Company details can hold a series of objects, detailing Company name, Email, Address, and Phone number for each Company name Safalo, Nintex, and Drawloop.
-
For Default value, if relevant, update the provided default value.
-
For Component workflowsA workflow that can be started from outside the tenancy; the workflow uses the "Component workflow" start event.: To mark the variable as a workflow outputVariable to store a value or file on completion of the workflow. Set up as a user-defined variable., select the check box for Output.
For more information about these fields, see Toolbar.
- Click Create.
Note: The Create variable button is available only if you have previously created a variable.
![]() Add a provided start event variable
Add a provided start event variable
Nintex provides start event variables for most third-party start events, such as Box - New file. If you add the provided variable, then you can use it later on in your workflow.
-
On the canvas, click Start event.
The configuration panel for Start event appears.
-
From the Start from drop-down box, select a connector.
-
From the Event drop-down box that appears, select an event.
The Source section appears.
Note: The Source section is available only for some events.
- Click
 Add variables.
 - Select the predefined variables that you want to add to your workflow.
Note:
-
To select all variables, click Select All.
-
If you know the variable and you want to find it faster, type the variable name in the Filter options field.
-
-
Click Add.
The Variables dialog box appears, displaying the variables you have selected.
Note: If you want to edit the selection of variables, hover over the variable, click
 , and then click Show Details. Edit the variable name in the Name field or click
  .
.
A drop-down list appears, displaying a list of provided variables.
![]() Create a start event variable (workflow inputVariable to store a value or file when the workflow starts. Set up as a start event variable.)
Create a start event variable (workflow inputVariable to store a value or file when the workflow starts. Set up as a start event variable.)
The Nintex - Component workflow start event allows you to create your own start event variables in the Start event configuration panel. You can use these variables to capture required workflow inputs (files or other data needed to start the workflow).
-
On the canvas, click Start event.
The configuration panel for Start event appears.
-
From the Start from drop-down box, select Component workflow.
The Start event variables section appears.
- Click Create variable.
- Click Create.
- For Name, enter a user-friendly name for the new variable.
-
For Type, select the variable type you want.
Data types of variables Variable type
Usage
Text String value, such as John. Decimal Decimal value, such as 1.2. Integer
Integer value, such as 1.
Boolean
Boolean value (Yes or No).
DateTime
Date or date and time value.
Collection
Set of files or array of values. If using for file inputs, make sure your default file location is configured.
File
File. Make sure your default file location is configured.
-
Click Create.
The Variables dialog box appears, displaying the Start event tab that is selected by default.
Note: The Create button is available only if you have previously created a variable.
The Create variable box appears.
![]() How do I handle files in my workflow?
How do I handle files in my workflow?
You can start a workflow whenever a new or updated file is detected (example: Box - New file), upload files on start or at any point in the workflow, generate documents from tagged templates, send and receive files via email, and manipulate files. File handling can be set up in your workflow start eventThe connector and event for triggering the workflow to run, including required configuration. An example is Box - New file, which triggers the workflow to run when a new file is uploaded to the specified folder. and actionsA tool for building the processes, logic, and direction within workflows..
Note: Your tenancy's default file storage location must be configured to hold files for later reference by the workflow. This location is used for uploaded files and for files stored as output from actions.
In addition to handling files in workflows, you can start workflows from files in Box using Nintex Workflow for Box.
![]() Handle files in your workflow start event
Handle files in your workflow start event
- Start your workflow when a new or updated file is detected in a service; for example, see Box - New file and Connectors
- Store a file reference for use later in the workflow (file share connector start events)
File share connector start events, such as Box - New file, require you to add each start event variable that you want to reference later in the workflow. The variables provided vary by start event. See Connectors.
In the Designer page:
-
On the canvas, click Start event.
The configuration panel for Start event appears.
-
From the Start from drop-down box, select a connector.
-
From the Event drop-down box that appears, select an event.
The Source section appears.
Note: The Source section is available only for some events.
- Click Add variables.
- Select the predefined variables that you want to add to your workflow.
Note:
-
To select all variables, click Select All.
-
If you know the variable and you want to find it faster, type the variable name in the Filter options field.
-
-
Click Add.
The Variables dialog box appears, displaying the variables you have selected.
Note: If you want to edit the selection of variables, hover over the variable, click
, and then click Show Details. Edit the variable name in the Name field or click .
A drop-down list appears, displaying a list of provided variables.
-
-
- Upload files when filling in a form from:
- Salesforce, using Nintex Drawloop DocAutomation for Salesforce
- The web or an app
Note: Your tenancy's default file storage location must be configured to hold files for later reference by the workflow.
-
Programmatically upload files for a Component workflowA workflow that can be started from outside the tenancy; the workflow uses the "Component workflow" start event.; see Nintex - Component workflow
Note: Your tenancy's default file storage location must be configured to hold files for later reference by the workflow.
![]() Handle files in your workflow actions
Handle files in your workflow actions
- Generate documents from tagged templates using Generate document
- Send and receive files via email; for example, see Assign a task
- Manipulate files in services (see Connectors):
- Get, store, move, copy, or delete files using file share connector actionsA workflow action that performs a basic operation through a connected system, such as Salesforce or Box., such as Box - Move a file
- Get and attach files in Salesforce
- Get and store files in SharePoint
- Signatures: Get and store signed documents using DocuSign or Adobe Sign.
- Store a file for use later in the workflow
For example, store any email attachments received by the task assignee.
In the Designer page:
- On the design canvas, click the action you want to configure.
-
Find the output field for storing the file or set of files.
For example, to store attachments received in task assignee email replies when they may attach multiple files, use the Assign a task Multiple file attachments option for the Store output field.
- In the output field, do one of the following:
-
Select a variable.
For output storing multiple files, select a collection variable. For output storing a single file, select a file variable.
Note: Your tenancy's default file storage location must be configured to hold files for later reference by the workflow.
-
Specify a file path.
You can use any combination of text and variables, beginning with the root folder. If available, use the folder browse icon
 on the right of the path field to navigate to the folder and any subfolders that you want, and then edit the path as desired to include variables and different text.
Availability of variable or path options for storing files varies by action. See Connectors and Workflow actions.
-
- Reference a stored file
For example, reference the new Box file that started the workflow to attach it to a task email notification or reference an image received by the task assignee to generate an invoice document.
Note: Your tenancy's default file storage location must be configured to hold files for later reference by the workflow. This location is used for uploaded files and for files stored as output from actions.
In the Designer page:
- On the design canvas, click the action you want to configure.
- Find the field where you want to reference the stored file.
- In this field, do one of the following:
-
Select the file variable associated with the stored file.
For example, select the variable for the new Box file that started the workflow or select the variable storing Multiple file attachments output from a task action.
-
Specify the file path where the file is stored.
You can use any combination of text and variables, beginning with the root folder. If available, use the folder browse icon
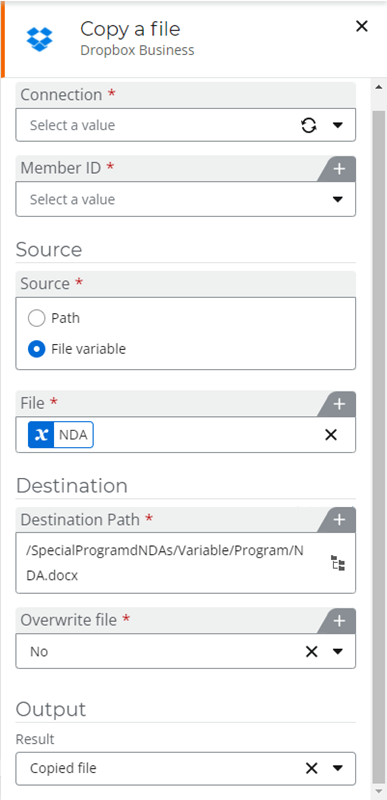
on the right of the path field to navigate to the folder and any subfolders that you want, and then edit the path as desired to include variables and different text.View example Both a file variable and a file path are used in the example image below for the Dropbox Business - Copy a file action. A file variable is selected for Source and a file path is specified for Destination.
The variables "CountryVariable" and "Program" insert the values into the file path as determined by earlier workflow logic (in this case, fields in a submitted form). For example, if the person submitting the form selects Australia for country and specifies Inspire2017 for program, then the resulting file path is "/SpecialProgramNDAs/Australia/Inspire2017NDA.docx."
Availability of variable or path options for referencing files varies by action and field. See Connectors and Workflow actions.
-
Configure the SharePoint Online - Add attachment to an item action
Important: Before inserting variables in the action configuration, you must manually type or select the values and populate other dependent fields in order to retrieve the output data. Once configured, you can insert variables to the required fields.
In the Designer page:
-
Click the SharePoint Online action group in the action toolbox.
or
Find actions by browsing action groups or by typing an action name or function in the Search field at the top of the action toolbox.
- Drag the SharePoint Online - Add attachment to an item action to the point in the workflow when you want to add the attachment to the list item in your SharePoint Online list.
- Click the SharePoint Online - Add attachment to an item action.
- Select a SharePoint Online connection.
Note:
Only the connections created with the List and libraries authentication method are available in the drop-down list.
For more information about authentication methods for SharePoint Online connections, see Connectors.
Don't have a connection? Follow these steps to create a connection.-
In the drop-down list for Connection, select Add new connection.
A new window is displayed to enter connection details.
- Type a Connection name.
- Type the SharePoint Online tenant URL.
- Click Connect.
- Select an account.
The entered URL is validated for uniqueness. If credentials are not stored in the browser for the selected connector service, then you are prompted for credentials. If credentials are stored you are prompted to select an account to use.
The Connection permissions window is displayed to assign owner and user permissions to the connection.
- In the Connection permissions window, do one of the following:
- Add Owners and Users and click Save permissions.
- Click Cancel if you don't want to assign other owners or users.
-
- Type a SharePoint site URL.
Example:https://domain.sharepoint.com/sites/hr
- Click Retrieve lists. Existing lists in the site will be retrieved for your selection.
- Select the List name that you want.
- For Item ID, specify the ID of the list item to which you want to add the attachment. You can insert a variable or type the value.
For more information on the fields and buttons, see SharePoint Online - Add attachment to an item action fields and settings.
SharePoint Online - Add attachment to an item action fields and settings
Important: Before inserting variables in the action configuration, you must manually type or select the values and populate other dependent fields in order to retrieve the output data. Once configured, you can insert variables to the required fields.
| Section | Field | Description | Variable types |
|---|---|---|---|
| (unlabeled) | ConnectionCredentials and other settings required to pass data between the workflow and the indicated service, which could be a cloud service, business application, or content store. | SharePoint Online connection for the list containing the item to which you want to add the attachment. To refresh the available connections, click | (n/a) |
| Source attachment | Attachment | The file variable containing the file to be added to the list item. | File |
| Destination item | SharePoint site URL | The URL of the SharePoint Online site containing the list that you want to use. To retrieve the SharePoint site data, type the SharePoint site URL and click Retrieve lists. Example: https://domain.sharepoint.com/sites/hr | Boolean, Collection, DateTime, Decimal, Integer, Text |
| List name | The name of the list containing the list item that you want to add the attachment to. The drop-down list is limited to lists within the site specified in SharePoint site URL. | Boolean, Collection, DateTime, Decimal, Integer, Text | |
| Item ID | The ID of the list item that you want to add the attachment to. Accepts either typed text or an inserted variable. | Integer | |
| Overwrite attachments | When set to Yes, overwrites any existing attachment of the same name. Accepts either a selection from the drop-down list or an inserted variable. | Boolean | |
| Output | Result | Stores the result of the action as an object with the following variable:
| ObjectA variable that groups several related variables of any type into a hierarchical structure. Objects can contain other Objects. |
How To Create Attachment Column In Sharepoint List
Source: https://help.nintex.com/en-us/nwc/Content/Designer/Actions/SharePointOnline-AddAttachmenttoanItem.htm
Posted by: williamsthelover1938.blogspot.com
0 Response to "How To Create Attachment Column In Sharepoint List"
Post a Comment